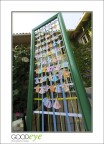
You cannot give a woman a budget and a year of lead time and not expect some papercraft all up in this piece. Thus the origami escort cards.
(There is also a tale of venue snafu and caboose-saving, but it must wait for another day.)

The origami will fit just fine in place card holders. I knew I wanted to display mine vertically, since table space was limited.
Display Stand
So when our duplex-mates attempted to throw out a mirror frame, I was all like, “Nuh-uh, you are getting repurposed as heck.” Me and the groom picked out some soft green paint, and over the next couple of days I primed and painted the frame in the driveway, leaving plenty of distance from cars and using ample drop cloth to keep our landlords from murdering me.
Apparently I was too excited to take process photos. Be assured it was as gripping as spray-painting a wooden frame can be. Here is a photo of the finished product instead:

Knowing we had about 70 guests, I got my tape measure and made marks for twelve evenly-spaced rows. I figured I’d staple-gun ribbon in a grid and clip the escort cards to the ribbon with tiny clothespins.
Once I saw the grid and its space limitations, I realized each card couldn’t be more than two inches wide. Maybe they could be more vertical?
They’d end up looking something like shirts on a line.
Hmm…
Origami Escort Cards
I knew origami shirts existed. Maybe I could do dresses for the ladies? Is it OK to enforce a gender binary if it’s super cute?
I don’t know. But I decided to do it.
I used these common dollar-bill origami shirt instructions and these less common Inklings and Yarns dress directions derived from a video tutorial by How About Orange. The patterns turned out to be simple and pretty easy to pump out.
I ordered paper in these solid colors and these washi style patterned colors.
The trick was getting paper the right size. The shirt folds down much smaller than the dress. I ended up using 4″ x 4″ (10 cm x 10 cm) paper for the dress and 6″ x 3″ (15.24 cm x 7.62 cm) paper for the shirts.
Yes, I had to cut down many pieces of nice washi paper to get the right size for the dresses. No, I couldn’t figure anything to do with the excess.

It took three or four hours of folding, which goes great with a season of Better Off Ted.
Assembly
Using an extra-fine Sharpie pen, I wrote names on the front and the table numbers on the back. Even with the permanent marker, until the ink dried it was possible to smear them, so I had to take care and not rush. Also, your hand can tell when you’re trying to write carefully and will make you skip consonants at every opportunity.
I hung all the cards alphabetically by last name. Then I wrapped the frame in garbage bags and strapping tape until it was nice and secure. It made the journey to the wedding intact — unless I only think that because someone saved my bacon without my knowledge, which is very possible.
Voila!

When I got to the reception and found that two clever guests launched a trend of wearing the escort cards as nametags!

It was a rad bonus and a double hoot. I recommend it!


2 Comments
Super cute!!
Awwww, thank you!