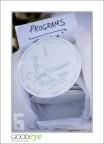
Again, you cannot give a woman a to-do list and a year of lead time and not expect some wedding papercraft programs up in this piece.

I considered a lot of options for programs. Fans are cool, and seed fans are super cool. But I couldn’t justify the cost and materials of printing them — not to mention we were expecting only 70 guests, which is a scant number for a formal print job.
Somewhere — and for the life of me I can’t track it down again — I saw someone post about a rotating dial program. This person’s even had a pocket for bubbles. I’m going to keep trying to find it so I can credit it. Holler if you know what I’m talking about.
Anyway, The dial thing was charming as heck and seemed like a fun thing to do for a ceremony with a small wedding party.
I put the names of party members (parents, officiant, maid of honor, best man, musician, etc.) radially on one side. On the other I put the actual program, a drawing and an expression of gratitude to all our guests.
Designing
I worked up everything in Illustrator, taking madd advantage of its rotation and font tools. I worked from the same template for both dials and prayed I got everything right so the circles would all match up. I must have been careful enough, because they did.
Printing
I got almost all our printing (save-the-dates, invitations, RSVPs) done by Overnight Prints, and the programs were no exception. (Overnight Prints asked me to share their current coupon codes, which you might enjoy.) I ordered the pieces as postcards, which is possibly not the best choice for everyone. The paper is VERY hardy and tough to cut with a X-ACTO. Even with scissors, it was hard to get a smooth edge on the circles, but they still turned out all right and I don’t think anyone noticed, or at least I never heard, “HEY, THESE CIRCLES AREN’T VERY SMOOTH.”
However printing the pieces as postcards meant the resulting programs were VERY sturdy, which was great. If you aren’t sure what kind of printing or paper you want to go with, I encourage you to experiment to see what gives you a nice, secure dial but is still easy to cut.

Assembly
I cut the straight lines and dial cut-out with an X-ACTO and mat — the rest with scissors that probably could have been sharper.
If you’d rather see these instructions as a video, this (this Papercraft Poseability video is pretty hand.


It took about an hour to do ten of these.
I recommend seasons of Archer for this also.
Display
I a-a-a-almost bought a bunch of little baskets for all the weddings holding-twee-items needs. But then I was like, dude, I don’t want to have to sweat collecting these all later (little did I know certain caboose-savers would sweat it for me, but, again, that is a story for another day.)

Naturally the boxes the postcards arrived packed in from Overnight Prints were just the right size for holding the stack of programs. So I just took my roll of nice wedding wrapping paper and wrapped that cardboard box! A little tissue paper and the programs were nice and stable and vertical and ready for plucking.
And guests could still fan themselves if they really got the notion.

